Showing posts with label Mains. Show all posts

Tuesday, May 24, 2011

Lemon and Pea Risotto


Source: die katrin {flickr}
You know what I love most about food, and about Italian food specifically? You can be a purist, and follow a recipe, and get a wonderful meal, or you can change and adapt, and add in what you like, and as long as you get the basics right, you'll still have a wonderful meal!

Pasta, risotto and pizza are all like this - there are recipes that you can follow that are traditional, and delicious, like the bucatini I made the other week, and then you can go out on a limb and try something different, with amazing results. The caveat to all this, is that you must start with good basics. The perfect pizza base, and fresh, simple ingredients, and you have a delicious pizza. Good quality pasta, and some roasted tomatoes, and you have a quick, easy and tasty dinner.

And after all my fears, risotto has turned out to be as satisfyingly flexible and wonderful. I've made it with chorizo and courgette, with roasted vegetables, with broccoli and blue cheese - there seems to be no end to the wonderful things you can add to the oozy, cheesy, wonderful goodness that is risotto. And if you're like I was, and you've been thinking, "rice? really? meh." remember that this isn't just common or garden rice, this is cheesy, textural, wonderful rice. A totally different bird, really.

Lemon and Pea Risotto
Serves 2 (easily doubled)

Ingredients:
1 onion, finely diced
Olive oil
Small knob of butter
250g (1 cup) Arborio rice
125ml (1/2 cup) white wine
± 1l (4 cups) stock (I use NoMu lamb, because that's what I have at home, but chicken, or veg will be fine. Use a good quality stock, not from a cube - that stuff is full of preservatives and salt)
1 lemon, juice and rind
250g (1 cup) frozen peas
grated Parmesan, to taste
Sea salt and black pepper, to taste

Method:
  1.  Fry the onion in a little oil and butter until soft and translucent - do not allow it to colour.
  2. In a separate pot, boil a litre of water, and add stock. Turn down to a simmer, and keep warm throughout the cooking process - add a little water if you think you'll run out.
  3. Add the rice to the pan, and toast in the oil and butter, making sure all is coated in oil, and it gets lightly toasted - a few minutes.
  4. Pour the wine into the rice, and allow to heat through, absorbing and evaporating the alcohol.
  5. When the wine has been absorbed, add the warm stock by the cup full, stirring to absorb between each addition. This should take 30-40 minutes.
  6. Using the small grater or a microplane, grate the rind from your lemon, and set aside, then juice it, being careful to extract the seeds.
  7. Add the rind and juice to the mostly cooked risotto, and add the frozen peas. Allow to stand with the heat off, while you grate the Parmesan.
  8. Add the Parmesan, stir to melt and mix, and allow to stand for a few minutes. 
  9. Add a knob of butter, stir, and serve.
This is fresh and light, a wonderful antidote to the exceedingly cold weather we've been having, but would be as good as a spring dish. The lemon keeps this bright and wonderful, and the peas give it a sweet touch. I also had some maple cured bacon on hand, which I fried up and chopped small, and added in at the end.

If you haven't tried risotto yet, do it! I was terrified, but now I'm making it once a week. It's neither difficult, nor onerous - give it a try!

Enjoy!

Bookmark and Share

Thursday, February 24, 2011

Guest Post: Homemade Pasta - Lasagne


A little while ago, my lovely friend Ash swooped in and saved me from another night of mother-in-law fare and arguing over which tiler to go with, and offered to cook me dinner. At her place. WIN. Now, if you knew my friend, you'd know that she has a lot of talents she keeps very well hidden. Such as this amazing cooking talent she claims she's too 'lazy' to use most of the time.. Now, Ash, you f**ked up. Cos now I know how much you rock in the kitchen. I suspected it, but this sealed it!

The tender, perfectly cooked pasta sheets, the tasty, savoury mince and the delicious cheese perfectly crispy on top.. This was one of the most delicious lasagnes I've had in a long time, and one that I'm definitely going to be whipping up at home (as soon as my kitchen is finished!)

And now, over to you, Ash! 

Wednesday night I had your favourite blogger, Polkadotcupcake, over for dinner at my house. In keeping with my new years resolution to be healthy and fill my life with GOOD things, I decided to make my favourite comfort food from scratch: lasagne.


Not only is it cheaper to make pasta from scratch, its tastier and healthier. And so easy to make. Total cooking time was about an hour, and this was to feed ten people.. Not that she and I eat for five people each... I have a lot of housemates. Total cost of the meal was about R90. Number of pots and bowls used: four. Could it be any easier?


Start off by making the pasta (recipe below), and then while it dries, you can start on the mince and white sauce.


Mix the dry ingredients together, then make a well in the middle. Beat the eggs and olive oil together in a separate bowl, and add the wet ingredients to the dry flour mix. Stir until it combines and becomes a soft dough. Sprinkle a flat surface with flour and knead the dough for about 7 minutes. Divide the dough into 5 pieces. 


Now, pull out that pasta machine that’s been sitting in your cupboard gathering dust. If you don’t have one, never fear, you can do this by hand quite easily.

Flatten a dough ball in the palm of your hand and feed it through the pasta machine at the widest setting. Carry on doing this, closing down a setting each time. My pasta machine has ten settings. By the time you get to the smallest, narrowest setting, run the pasta through twice. Now either place it on a damp dishtowel (otherwise its going to stick to your table), or hang it over a clean chair. Repeat with the rest of the dough balls.

If you don’t have a pasta machine, you’re going to have a fun time with your rolling pin. Sprinkle flour on a flat surface and start rolling until your dough ball is about 1.5mm thick. Repeat with all the dough balls. Place the lasagne on a damp dishtowel or hang it over a chair. 

Now you can start on the mince and white sauce. For the amount of lasagne I made, I used about 700 grams mince, two tins of tomato and onion mix and one onion {Editors note: you can use your favourite bolognaise recipe, or this one}. My secret ingredient is bisto (two tsp). I used about 1.3 litres of milk for the white sauce, and my secret ingredient for that is a cube of chicken stock.

The trick to home made lasagne is making it quite saucy. The liquid soaks into the pasta, softening it and allowing it to cook faster.

Start by pouring a little white sauce in the bottom of a large oven proof dish. Then put a layer of your fresh pasta in the dish. Spoon a layer of mince onto the pasta, and then a generous amount of white sauce. Repeat. I used three pasta-mince-white sauce layers. Put one last layer of pasta on top, and cover generously with the remaining white sauce. Sprinkle cheese on top, and pop in the oven at 160 Celsius for half an hour or until the cheese is golden and bubbling. 

Take it out of the oven and leave it to cool for 5 minutes. Serve with a green mixed salad.


Homemade Pasta 

Ingredients:
500ml (2 cups) flour
3 eggs
1 tsp olive oil
1 tsp salt.


Mix the dry ingredients together, then make a well in the middle. Beat the eggs and olive oil together in a separate bowl, and add the wet ingredients to the dry flour mix. Stir until it combines and becomes a soft dough. Sprinkle a flat surface with flour and knead the dough for about 7 minutes. Divide the dough into 5 pieces.


White Sauce
Ingredients
1 tbsp butter or margerine
2 tbsp flour
(Note: no matter how much white sauce you want, you need to use double the amount of flour to butter)
± 1 litre milk

Method:
Melt butter in a pan, until liquid, but not brown or burnt. Then, add the flour, and stir to mix, incorporating all into a paste. While still over a low heat (or off the plate, if it takes too long to cool), add a little of the milk, just enough to create a more liquid paste, and use this opportunity to squash out all the lumps with the back of a spoon. This will help your final sauce to have as few lumps as possible. Once the paste is smooth, add the milk a little at a time, making sure to incorporate it. When about half is added, change to a whisk, and keep whisking until almost all the milk is added. Then, let it cook for about 5 minutes, whisking from time to time, to cook the flour, letting it thicken. If it gets too thick, add some milk, if not, remove from heat when thick, and add a grind of black pepper, or even some grated cheese.

Bookmark and Share

Monday, January 24, 2011

Roasted Broccoli and Blue Cheese Risotto for Two


Source
So, it's not the most photogenic thing I can think of, but, damn! it's definitely one of the most delicious! My love affair with risotto started only recently, when we were on honeymoon in Croatia. After having worked in a Thai restaurant for 4 years, I was always like "Rice? Meh." and I never ordered or ate risotto my whole life. I wish I'd known what I was missing! Creamy, cheesy deliciousness without the heaviness of cream! Comforting, warm and heavenly, risotto was nothing like I imagined it would be - it was a MILLION times better!

It started off in Rome, where I had a less than exciting mushroom risotto. I swear, those tourist restaurants skimp on quality and charge the earth, because they think we wouldn't know any better. It was alright, but I new there was some key element missing that would make everything right. That risotto was a little bit watery, and a little undercooked, not the best introduction, but I persevered.

Source
The next was at a tiny restaurant on the island of Vis in the Adriatic Sea, off the Dalmatian coast of Croatia. We discovered this little place on a long walk along the waters edge at sunset, and popped in just before the dinner rush. I'd been reading up on things we should try while in Croatia, and decided on the Black Risotto, a specialty of the area. Flavoured with squid ink, it was delicate, cheesy, rich, and delicious. Whatever the hubs had has faded in contrast with that risotto. A deep black from the squid ink, with little pieces of tender octopus, garnished with a single, red cherry tomato, it was exactly what I was looking for. And there my love affair started; I was determined to recreate this at home, but where to start?!

Source
[Enter, stage left: The Good Food and Wine Show] At the Show, I found an 'easy' package of risotto, which claimed to make cooking risotto easy. It included dried mushrooms, the arborio rice, all you needed was the wine, stock and cheese. Sounded easy enough, but I was still cowed by the reputation of risotto as finnicky and hard work. So I tried a baked risotto, and it turned out.. meh. It was alright, but it wasn't the creamy, rich deliciousness that I was after... Back to the drawing board.

A few months passed. We got married, life got in the way, and I was tired. I took a break from blogging, and it's been summer. We've had a heatwave, planned some renovations, and it's a new year. So in a bid to find something a bit more interesting (and vegetarian, in our bid to eat meat-free once a week), I decided to attempt risotto again. I bought the arborio rice, the Parmesan cheese, I planned a creamy, cheesy, mushroom risotto. You know, start with the basics. And you know what, people? It wasn't that hard. Sure, it took some time, and you can't go watch TV, but I was on the phone, and stir, stir, stirred away, and 45 minutes later, et voila! we had a plate of heaven on our hands! And I was hooked.

Source
That was last week. This week, I got more adventurous. Yes, I'm finally getting to the point of this post. THIS HAS BLUE CHEESE! Did that get your attention? I hope so. This cheesy bowl of heaven pushes all the right buttons! With a touch of green goodness from broccoli and cauliflower, and a whole lot of creamy heavenliness from the blue cheese and Parmesan, this is a winner. A keeper. And a whole bowl of goodness.. All you need is a little bit of patience, and within an hour, you'll have a wonderful, impressive, delicious meal to serve your loved ones. Go forth, and make risotto! I know I will be!

I scaled down the ingredient this time, as I was cooking for two, and the last batch (500g of rice) meant I was eating risotto for 3 days! These measurements were perfect for the two of us, with some leftovers for my lunch, win!

Roasted Broccoli and Blue Cheese Risotto for Two

Ingredients:
1 onion, chopped
Small pat of butter
Glug of olive oil
250g (1 cup) arborio rice
± 100ml (1/3 cup) white wine
± 1 litre (4 cups) stock (I used about 1.5 litres)
Small head broccoli and cauliflower, cut into small florets
± 125g (1/2 cup)Parmesan cheese, grated
Half a wedge of blue cheese

Method:
  1. Saute the onion in the butter and oil for a few minutes until soft. I usually let them brown a bit, but if you want a whiter risotto, don't let them brown.
  2. In another pot, make up a litre of hot stock, and keep it on a low temperature for the duration of cooking. You want it to be warm, but not boiling. If you look like you'll run out of stock before the end of cooking time, top it up with some clod
  3. Add the rice to the pan, and turn up the heat a bit to toast the rice for a few minutes, until coated with the butter/oil, and slightly translucent on the edges - 2-3 minutes. Keep the rice and onion turning, so they don't burn.
  4. Add the wine to the hot pan, and turn down the heat to medium. The wine should bubble quite vigorously, and will boil away and evaporate quite quickly.
  5. When the wine has boiled away, start adding the stock, a ladleful at a time. If you don't have a ladle, use a large spoon and put about 2-3 spoons in at a time. You want just enough to loosen it up, without drowning it. When that liquid's absorbed, add the next, and so you go, stirring, adding, stirring, adding continuously for about 35-45 minutes, or until your rice is cooked, with a slight firmness to it (al dente).
  6. When it's cooked, you can add anything - sautéed mixed mushrooms or asparagus, bacon bits or peas and mint, it's really up to you and your imagination, but I roasted up some broccoli and cauliflower (and then steamed a bit more, because it reduced too much when roasted), and added creamy blue cheese (Blue Tower from Fairview is a lovely, creamy blue, and doesn't cost the earth)
Serve with a side salad, or even as an accompaniment to a meat-centred dish. Or do what I do, and enjoy it with a glass or two of that wine you had to open to make the risotto. And remember, if you wouldn't drink it, you shouldn't cook with it! I discovered a lovely Californian Pinot Grigio at Pnp last night, and at just R29 it beat the locals, and was delish! Ah, I know, my carbon footprint.. but can you blame a girl for wanting to explore the world? through wine, at least...

And after that long story, I leave you.
Take care, my friends..


Bookmark and Share

Friday, October 29, 2010

Tangy Beef Wrap


Hi dearies!

{Image source: chapparal, flickr - cropped}
Ah, it's summer again (or almost), and with summer comes salads, wraps and all things delicious and cold. But you get nights, especially in spring, where the wind blows cold and the last thing on your mind is a salad. Now, last week I ordered all sorts of fun salad veggies, and then the weather turned cold, and I'm stuck with a ton of salad, and not much desire to eat it. So what do I do? Pop the whole lot into a wrap with something delicious and warm!

Last night, I wanted something quick and easy, and I needed to use up some of the lettuce and other salad ingredients I had lurking in the fridge. I'd worked late, and the hubby was at a work function, so my sister and I whipped these up for a quick weeknight dinner. And can I say something? These were delicious! Tangy from the sour cream, slightly spicy from the cumin and cayenne pepper, and wrapped in a soft tortilla with crunchy lettuce and cucumber to finish it all off, divine! Since the hubby was full of finger foods, I got to take the third one to work today, yippee!!

{Image source: stuart spivack, flickr}
Tangy Beef Wrap

Serves 3
Ingredients:
1 pack of beef goulash (the pre-cut strips of beef sold in PNP. Or, buy a steak and slice it yourself after cooking)
A slice of bacon per person
250ml sour cream (I use Clover, because it seems to last longer if I don't use the whole lot at once)
1 tomato, chopped
1/4 small cabbage, finely sliced *optional
1/2 yellow onion, diced
Lettuce leaves, washed (I used 2 per person, but I had a really little lettuce)
About 4-6 cucumber slices per person
150ml tomato and onion mix
Paprika, cayenne pepper, cumin, white pepper and salt to taste (I'm not using exact amounts here, because I just sprinkled it over a few times, to taste)
Cheddar cheese, grated
Knob of butter
Olive oil

Method:
  1. Heat a frying pan, and pop in a small knob of butter, and a drizzle of olive oil. Heat until quite hot, because you're going to use this to brown the meat, and a hot pan is best for that.
  2. Unwrap the beef strips, and season the meat. I sprinkled salt, white pepper, cumin, cayenne pepper and some paprika, then covered it with the clingfilm it was wrapped in, and left it while the pan heated.
  3. While the pan heats, dice your onion, tomato and any other veggies you have on hand. I had some cabbage, and not much else, so that went in, and I used the salad veggies in the wrap raw.
  4. When the oil/butter mix is hot, put the beef strips in the pan and leave for a couple of seconds. Don't move it immediately, you want the meat to brown, not cook right through. Stir after about a minute, and brown the other side. When it's all brown, remove to a plate, and set aside, covered.
  5. In the pan,  fry the bacon, and set aside with the meat once cooked to your liking.
  6. Into the same pan, pop the onion, and a little more oil if you need it. Turn the pan down, and cook the onion until translucent, adding the cabbage a few minutes in. While it cooks, sprinkle some more of the spices over, but be careful of adding too much. You can add more, but not take it out, so add less now, then taste when you've added the sour cream and add more to taste.
  7. When the onions and cabbage have softened, add the tomato, and cook a little more, then add the tomato and onion mix, and heat through.
  8. Stir in a couple tablespoons sour cream, and heat, then taste. Add more spices or more sour cream, or even some more tomato and onion mix, depending on what's missing, then add the beef strips, and heat through.
  9. Turn off the pan, and remove from heat, to prepare your wraps.
  10. Place each wrap into the microwave individually, for 20-30 seconds, then roll when it comes out, to retain flexibility.
  11. When they're all heated and softened, lay each out, and lay the lettuce on top, then the slice of bacon. Spoon some meat mixture on top, then the grated cheddar and cucumber slices. Try not to overfill, as it makes wrapping them tough.
  12. Fold the sides in, then roll the side closest to you over the filling, pushing the sides and the filling under, and roll the whole thing over, covering all the filling. I serve them whole, because I like to eat them whole, or serve sliced in half on the diagonal.
Please make these! They're quick, easy, flavourful, and easy to pack with extra veggies, without making a big fuss! You could also vary the spices, making it more or less spicy, depending on palates, and even use chicken in place of beef. If I'd had some avo, a couple of slices would've been delicious! If you've never eaten a wrap outside of Kauai, PLEASE make these, it'll change your mind!

Bookmark and Share

Friday, October 8, 2010

Spring Baked Mushroom Risotto


Hello!

{Image source: placid casual}
So, it's on my 30 before 30 list. It's been something I've been wanting to do for a while now. And I finally did it! I've been planning to make risotto for an age now (no seriously, I've literally been telling the hubs every night for 2 weeks). I mean, I've have at least a dozen conversations about it over the last two weeks, and Claudz, Marisa, Ally, Matt and Nina have all made it since then, we even had a Twitter Risotto Off planned, that I started. And yet I hadn't made it. That's wrong, right? So I gritted my teeth, and eventually the weather turned a little cooler, and last night was the night. The Night I Made Risotto. Deserves capitalisation, in my book! And I had this package, that I bought at the Good Food and Wine Show a few months ago, a kit with the arborio rice, dried mushrooms, seasonings and one or two other things. I used that, so I think this was a cheat, and I'll be doing it again.

I did, however, peel and shell a whole pack of broad beans for the little fava beans inside, and serve the risotto (I have my in-laws down, it was hard enough getting into the kitchen, without suggesting a purely vegetarian meal!) with pork sausages and sauteed asparagus. And let me tell you, that this was a crowd pleaser! I think I impressed the inlaws.. maybe I'll be allowed in the kitchen more often now.. Oh. And I just realised I bought the wrong cheese - how's that for a foodie fail? Ah well, alls well that ends well, right? And it was still delicious, if not perfect. Just means I'll have to keep at it until it comes out right, hey?

Spring Baked Mushroom Risotto

Ingredients:
1 package of Cook me! Mushroom Risotto mix (500g)
1/2 an onion, diced
125ml (1/2 cup) dry white wine
750ml (2 1/2 cups) good quality stock - I used veggie stock
1 packet broad beans (here's a good how to for broad/fava beans)
1 bunch of asparagus (half for the risotto, half for serving)
250ml (1 cup) grated parmesan cheese (I used pecorino - foodie fail)
Glug of olive oil and a knob of butter

Fresh, unshelled fava beans
Method:
  1. Preheat your oven to 180 degrees Celsius.
  2. Heat a heavy based pan, and put a knob of butter and some olive oil in.
  3. Fry the onion for a bit, until soft and translucent.
  4. Pour the rice mixture in, and turn up the heat. Stir to coat the rice in oil, and heat until it pops a little - you really want to toast them a bit.
  5. Pour the wine in, and stir until the rice has absorbed the liquid. At this point, you can carry on on the stove top, stirring and incorporating the stock, ladle by ladle, but I had a couple of over things I still wanted to make, that needed my hands. So I decided to bake it.
  6. Transfer the rice mixture to an ovenproof dish, and pour in the stock, stirring it gently to make sure the stock is mixed in, and pop the whole thing into the oven for 20 minutes.
  7. Meanwhile, steam your fava beans for a few minutes, until the skins wrinkle up and they go a dull, grey colour.
  8. Allow to cool, and peel them, revealing a bright green, nutty bean. Reserve, and stir into the risotto when you take it out.
  9. After 20 minutes, remove the risotto from the oven, and check that it's wet enough. Add some more stock if it looks dry - the oven is always hotter than the stove top (and mine doesn't seem to have a thermostat), so you'll probably need more liquid to keep it creamy. You'll see that the rice has swelled up a lot, and it'll swell up more and get creamier. Don't add the fava beans now, add them at the end.
  10. Put back into the oven for another 20 minutes, and start with the asparagus. 
  11. Snap the woody ends of your asparagus, and snap in half. The stalks are woodier than the tips, and need a little more cooking. So in the pot that you steamed the fava beans in, steam the broccoli stems for a few minutes, then add the tips for another. Say 3 minutes for the stems, and 2 for the tips, which brings it to 5 in total for the stems. Remove from the heat, and run under cold water to refresh.
  12. Chop the stems a bit smaller, and set aside with the shelled fava beans.
  13. When 20 minutes are up, take out the risotto out, stir some more liquid in if it's a bit dry, then stir in the chopped asparagus stems and the fava beans.
  14. Then stir in the cheese, handful by handful, getting it all worked in.
  15. Quickly stirfry the asparagus tips in some butter, garlic and lemon, and serve all hot.
This is a bit long winded, but you get the picture. The baked risotto is slightly less creamy, but I hear adding a cup of liquid right at the end helps with creaminess. It also means you're free to do other things, whether that's frying up some sausages, or hanging the laundry, which all helps in the end, right?

I still plan to try the stovetop risotto, when it's just the two of us. My boy can take a vegetarian meal, but the in-laws are rys, vleis en aartappels mense (rice, meat and potatoes people). They enjoyed this, I served it with some pork sausages, which they eat rarely, and I think it made a nice change for them. I would've liked it a bit creamier,but that gives me a great excuse to make it again, right?

Enjoy!

Bookmark and Share

Thursday, September 30, 2010

Oven Baked Cheese Stuffed Chicken


Hello dears! 

{Image source: pvera, flickr}
So, you read the title and you realised that there is no part of this that isn't good, right? I mean, we have the main players (cheese and bacon) the backup (chicken) and the stage (oven). What could possibly be wrong here? You were right, nothing! While I was (again) planning to make risotto last night, my sister convinced me to make it when she can come round and share, so I had to make another plan for dinner. And while we've already had chicken this week, I thought it was different enough that it wouldn't matter, and I needed something fast.

These are fantastic to make on those nights when you have little time, and less patience. Just steam some spinach or chard, mix it with some cream cheese, beat the chicken flat, fill, wrap, pop in the oven. Prep takes 10 minutes, cooking takes 20-30 (depending on the size of your chicken breasts). So this is quick, easy and flavourful! Get to it!

Oven Baked Cheese Stuffed Chicken
Ingredients:
Skinless, boneless chicken breasts (as many as there are people, more than one per person if you have hungry people. I bought a pack of 4, made all of them and we ate 1 each, with 2 leftover. And mine were small, so its up to you)
Plain cream cheese (or flavoured, if that's your thing. Don't know about salmon cream cheese and chicken though...)
Spinach or Swiss chard, roughly chopped
Small block of feta diced *optional
2 rashers of streaky bacon per chicken breast
Salt and pepper to season

Method:
  1. Preheat your oven to 180 degrees Celsius.
  2. Steam or quickly boil your chard/spinach in the microwave - 3 mins worked for mine. Drain and set aside to cool.
  3. Using a can, pan or meat mallet, beat your chicken breasts to about a centimeter thick - you want them quite thin, so you can fill and roll them.
  4. Once flattened, season both sides with salt and pepper, and set aside.
  5. In a bowl, mix the chard and the cream cheese. You'll have to judge how much you need, based on how many chicken breasts you have, but for 4 small chicken breasts, I used just over 2 tbsps cream cheese.
  6. Mix in the diced feta, and spoon the cheese and chard mix into the centre of each breast.
  7. Wrap the chicken around the filling, covering all of it with the chicken. You don't want to over-fill these, as all the cheese will leak out when baking. If you fill them properly, it should stay inside.
  8. When they are all full, take the bacon and wrap it around each breast, sealing in the cheesy goodness. Mine took 2 rashers per breast, but I suppose if you have enormous chicken breasts you might need more. Judge it. And remember, there's no such thin as too much bacon.
  9. Spray an oven-proof dish or cookie sheet with some oil, and place the chicken breasts seam side down into the dish.
  10. Pop the whole lot in the oven, and bake for 20 minutes. Take it out, and stab the chicken, if the juice runs clear, its cooked, if not, pop it back in for another 5-10 minutes. You don't want to overcook or undercook the chicken, so keep an eye on it. 
  11. If you like your bacon crispy, when the chicken is cooked, turn up the grill and brown the bacon for a few minutes.
  12. Remove from the oven, and serve hot with a salad, and sweet potato mash.
This was delicious, fast and easy, and came with leftovers. Plus, it had cheese and bacon which, next to cupcakes, are my two favourite things.

So make this, and thank me later!

Enjoy, lovelies!

Bookmark and Share

Tuesday, September 28, 2010

Sweet Sticky Chicken and Blue Cheese Sauce


Hi there!

{Image source: Oakmonster, flickr}
So I had EVERY intention of making my risotto last night for the twitter #RisottoOff, but then I got tired. And lazy. And I couldn't get visions of sticky chicken out of my head. And we had leftover potato bake to eat. So sue me, I didn't make what I'd planned. SUCH a rebel.

And while I was thinking about the sticky chicken, I remembered that last months Fresh Living Magazine insert (Fresh Ideas) there was a sticky chicken recipe. So as usual, I looked at the recipe looong and haaard, and then I did my own thing. It's a curse, I tell ya. Their version looked fantastic, and my version was pretty amazing too. The hubby and I were licking our fingers and making those mmmmmm sounds of delight, so I'm pretty sure you'll like this one. And the blue cheese sauce I made to go with it? Well, I'll add that in as a bonus, because the sticky chicken just wouldn't be the same without it!

This is more of a method than a recipe. I mostly tossed things together, and tasted it, and added other things. So go wild! You want some spice? Add a pinch of chilli flakes, cumin or cayenne pepper. Want it fruitier? Mix in some pineapple juice. This is a flexible dish, so be creative with what you want... And with that, I give you:

Sweet Sticky Chicken
Served 2, with leftovers

Ingredients:
Chicken pieces (I used 5 chicken drumsticks)
Barbeque sauce
Chutney
Juice of 1 orange
2 tsp brown sugar
1 heaped tsp finely minced garlic
Salt and fresh black pepper

Method:
  1. Preheat the oven to 200 degrees Celsius.
  2. Cut 2 deep slashes into each piece of chicken, more if its a big piece, like a thigh or a breast. This helps the marinade/sauce mixture penetrate more deeply.
  3. Mix all the ingredients together in an oven proof dish, large enough to hold the chicken pieces.
  4. Put each piece of chicken into the dish with the mixture, rolling the pieces around in the mixture to ensure even coating.
  5. When all are in, pop the whole lot into the oven, but don't run away! You'll need to keep turning the chicken, to avoid it drying out in the oven. I turned my pieces every 10 minutes or so for about 30-40 minutes.
  6. Then turn the grill on, and grill for a few minutes, or until the chicken is sticky and slightly caramelised.
Blue Cheese Sauce
Ingredients:
130 ml sour cream
2/3 wedge of blue veined cheese
Salt and pepper to taste
A little milk to thin if necessary

Method:

  1. Put the blue cheese and sour cream into a dish. I have a smoothie cup thing that came with my stick blender that's quite good for this.
  2. Using the stick blender, whizz the two together until combined. This will both integrate the blue cheese into the sour cream, and thin the sour cream slightly.
  3. Dribble in a little milk if the mixture seems too thick, and add salt and pepper to taste. I only added some pepper, since my blue cheese was quite salty
Serve the chicken with a mixed salad and the blue cheese sauce for dipping. This is rich, yes, but delicious, and quite fast! While the chicken is cooking, you can make the blue cheese sauce and salad, and by the time all that has come together, you're good to go.

Enjoy!

Bookmark and Share

Thursday, September 23, 2010

Creamy Spring Tagliatelle


Morning!

{Image source}
Spring is in the air here in the Southern hemisphere, and although we may not always think so, summer is on its way! With the changing seasons, I start to want more fresh veggies and less of the warm, yummy comfort foods I craved over winter. However, spring isn't without its ups and downs, so while we may have fresh spring veggies around, it sometimes feels decidedly colder than it should! Last night it was freezing, and I wanted something warm, but with a spring feel to it, to get me in the mood. Add to that my new amazing veggie box from The Ethical Co-op, and we were away!


This pasta was born from my ignorance in how to prepare asparagus. I've just started buying a weekly organic veggie box from The Ethical Co-op and in it I got a bunch of things I've never used before. You'll have noticed that I tend to stick to the same foods, although I prepare them differently. This is partly habit, and partly just what's available at my local shop. With the veggie box, I pay a flat fee, and get a mixed box of seasonal, organic veggies. I don't choose what goes in, so I'm forced to find a way to use what comes in the box. This last week, I got asparagus, Swiss chard and mangetout, along with some others, and I've never cooked with in my life! So google to the rescue, and I figured things out.. And boy, am I glad I did! This was fresh, tasty, creamy and delicious! I hope you like it..

Creamy Spring Tagliatelle
Serves 3

Ingredients:
1 bunch of fine, early spring asparagus (about as much as you can hold in your hand, while your fingers can touch your thumb
1/2 a pack of mangetout (say, about 10)
4-6 leaves of Swiss chard, depending on size
1 onion, chopped finely
1 handful of cherry tomatoes
2 tsp minced garlic
Half a pack of tagliatelle
100-150ml cream (I use reduced fat, and it was fine)
Blue cheese (I cut 2 sides off a wedge)
Grated Parmesan (to taste)
Reserved pasta water
Salt and black pepper to taste
Method:
  1. If you have dried pasta, put that on to cook so long, as it'll be the thing that takes the longest.
  2. Prepare your asparagus and mangetout, but breaking off the woody/stalky ends, and breaking into pieces. This early season asparagus wasn't very woody at all, so I just broke off a centimeter or so, and the mangetout, I just broke off the stalk.
  3. Separate the tips of the asparagus, as they will not need as much cooking as the stalks.
  4. Slice the chard into more manageable pieces, and set all the greens aside.
  5. Slice the onion, and fry in a little oil on a medium pan, until the onion is soft, but not very coloured.
  6. Add the garlic, and stir, then add the cherry tomatoes. Fry for another couple of minutes.
  7. Add the cream, and allow to heat through, letting the cream thicken, and reduce a little. Add the blue cheese and Parmesan, and stir to melt.
  8. When the pasta is cooked, drain it, reserving as much of the cooking liquid as possible.
  9. Put the asparagus stalks, chard and mangetout into a strainer or steamer and lower into the cooking water. 
  10. Cook for a minute, then add the asparagus tips, and cook for a further minute. Remove from the water, but don't throw the water away yet.
  11. Add the cooked greens to the onion and cream mixture, and stir to mix.
  12. Add the tagliatelle to the same pot, and stir, mixing it into the cream and veggies. If there is not enough liquid, spoon some over from the pasta pot. The starch from the cooked pasta will help make a lovely, silky, creamy sauce for the pasta.
Serve in a bowl, with plenty of cracked, black pepper and Parmesan cheese!


Bookmark and Share

Tuesday, September 21, 2010

Mock Oxtail (Slow Cooker)


Hi there!

{Image source}
So, it's been an unforgivably long time since my last post. My apologies, you know you just have those weeks sometimes? Well, I had one last week. But nevermind, I'm back this week with a corker! You might be wondering about the title, so let me tell you a little story..

Last week, while shopping with the boy, I spied a package in the meat section that looked like heaven! I leaped on it, and squealed 'Oxtail!'. The kilo price was LOW (R25 for my locals), and I was keen. Immediately I had daydreams of red wine, rosemary and garlic simmering gently all day, and I was a goner. 2 packages in the trolley, and we were headed for the till, congratulating ourselves (OK, I was congratulating MYSELF) on our incredible buy.

Fast forward a few days, and I've gotten totally overexcited and invited friends (hi Marisa and TheHusband) over for oxtail, and I started worrying that there wouldn't be enough! Can't have that with two hungry boys in the house! So I scuttled back to the shop, only to find, to my horror, that the kilo price more than doubled in 2 days! So bought some stewing beef, consoling myself that I had gotten in before they had gotten greedy.... and went home to discover that I had, in actual fact, bought Ostrich Neck. Yes, my friends. Extra Lean Ostrich Neck (I saw the O and the X and came up with oxtail, go figure..)

So. That is why this dish is known as mock oxtail, since it was actually Ostrich Neck and Beef. Ah well. After doing some considerable last minute research, (among them this post from Homemade Heaven, which was invaluable) I discovered that Ostrich Neck is actually the lesser known, but much leaner counterpart to oxtail. Also tough, it requires long, slow cooking, and can be cooked in much the same flavours as oxtail. The clincher, however, is that ostrich is MUCH leaner than oxtail, and is much better for you than oxtail (apart from being so much cheaper!) So all in all, I wasn't unhappy with my erroneous purchase... though I'll have to make actual oxtail now to compare....

Mock Oxtail or Ostrich Neck Stew

Ingredients:
1-2 kg ostrich neck (or oxtail, or a mix of ostrich and beef), excess fat trimmed off
1 small bunch of carrots, peeled and chopped roughly
1 onion, sliced
300 ml red wine
250 ml stock (I used veggie, but beef or lamb would be fine)
2 tsps cumin
1 tsp cayenne pepper
1 can tomato and onion mix
5 cloves garlic, chopped roughly
1 tsp origanum
1 tsp parsley
1-2 sprigs fresh rosemary (or 1 heaped tbsp dried)
Salt and pepper

Method:
  1. In a hot saucepan, fry the meat in batches in a tiny bit of oil until browned on all sides.
  2. Remove meat from the pan, and set aside.
  3. Lower the heat, and add some more oil, and fry the onion until soft.
  4. Add the spices and fry for a minute in the oil, then add the herbs and mix.
  5. Add the tomato and onion, and heat through.
  6. While the tomato mixture is heating, peel and roughly chop the carrots, and arrange them in a layer at the bottom of the slow cooker.
  7. Arrange the meat pieces over the carrots, and salt and pepper the meat liberally (I forgot this step, and the food was quite undersalted. I added salt in at the end, but it would've been better here.)
  8. Pour the wine, stock and tomato mixture over the meat and carrots.
  9. Turn the slow cooker to High for the first 3-4 hours, then low until cooked. (I put mine on at 10.30am, and put it on low. When it seemed to have done very little in the first two hours, I turned it up to High and went out. I came back at about 4.30-5ish, and turned it down to low, and went out again. It was pretty much done at 7.30ish when we got back, and all I had to do was make a salad and some cheesy mashed potato to go with it.)
Serve with mashed potatoes, rice, or even crusty bread - anything to soak up the yummy, winey, garlicky gravy, and some steamed veggies or a salad, to cut through the richness of the meat. I guarantee you your guests will be raving, and it'll look like you slaved over the stove all day, and in reality, you slaved for half an hour, and let the slow cooker do the rest!

Now, that's my kind of meal!

Enjoy!


    Bookmark and Share

    Wednesday, September 8, 2010

    Cottage Pie

    Morning dearies!

    So, it's been a while, I know. I've had a spot of bloggers block, and although I've been cooking the same as usual, nothing really grabbed me enough to share it with you. So forgive the silence, but it's better than boring food, right? I haven't even been to any really interesting restaurants, so I can't even share that! (Blame that on post-wedding brokeness.. Anyone want to sponsor me a dinner at La Mouette? I'm desperate to try their Spring tasting menu!!)

    Anyway, on a less begging note, I was sitting at home yesterday with limited time and limited resources. I had some frozen beef mince, some potatoes and some random veggies in the fridge. My initial thought was to make spaghetti bolognaise (my old standby, I can make it with my eyes closed!). But I thought I'd make my new hubby something new - and when I say new, I mean old-favourite-but-new-to-me. And with the potatoes, my version of Cottage Pie was born!

    I'd always worried about the difference between Cottage and Shepherds Pie's, and I was never sure which was which. A short search this morning revealed what (should have been) obvious: shepherds herd sheep - hence a lamb-based pie. Anything with beef and mashed potato in pie form, is therefore a Cottage Pie. There we go, today's conundrum SOLVED! Yay for google.

    Also, my sister (who I lived with until March) has issues with the mince-and-mashed-potatoes thing - there's something about it that bothers her. So although I love it, I've never actually made a Cottage Pie. So I kept it simple - a bolognaise sauce, kept slightly drier (as it doesn't have to coat the spaghetti), delicious mashed potatoes, and cheese. Lots of cheese..

    Cheesy Cottage Pie

    Ingredients:
    3-4 potatoes, peeled and chopped
    500g beef mince
    1 can tomato and onion mix or chopped tomatoes
    1 onion, sliced
    1 tin tomato paste
    2 carrots, diced
    200ml frozen peas
    Grated cheese (enough to make the mash cheesy and to put on top)
    1 tsp origanum (I use dried, my herbs aren't looking good after winter)
    1 tsp mixed Italian herbs
    1 tsp parsley
    1 tsp thyme
    2 cloves garlic, minced (or 2 tsp bottled garlic)
    1 tbsp ketchup
    1 tbsp chutney
    1 bay leaf
    water, in case it gets too dry (or stock, or cooking water. I parboiled the carrots in the microwave, and used that water)

    Method:
    1. Peel and chop your potatoes, and boil them in salty water until cooked.
    2. Heat a largeish pot with a little bit of oil in it, and brown the mince, until there is no pink left, breaking up large pieces with a spoon.
    3. Add the can of tomato and onion mix when the meat is browned, turn down the meat, and allow to simmer
    4. Slice, and fry the onion in a separate pan, until translucent. Add the garlic towards the end, and fry until fragrant.
    5. While the onion and mince are cooking, dice your carrots, and boil them in the microwave for about 5 minutes. You want them just on the slightly undercooked side, so that they finish in the pot with the mince.
    6. When the carrots are finished, strain, reserving the water. Add to the pan with the onions, and stir around.
    7. When the onion mix is cooked, add it to the pot with the mince, and stir it in.
    8. Add all the herbs to the pot, and stir in. Keep the mince simmering, but don't let it burn.
    9. By now your potatoes are probably cooked. Drain, and leave to cool for a minute.
    10. Preheat the grill.
    11. Mash the potatoes, with a little butter, salt and cheese. Mash to desired consistency.
    12. Take the mince off the stove, and pour into a deep (I think mine was about 10cm deep) baking dish, leaving enough space at the top for the potato layer.
    13. Spoon the mashed potatoes in, a little at a time, spreading carefully with the back of a spoon, to cover the mince
    14. Spread a layer of cheese over the top.
    15. Pop into the preheated oven, right under the grill and watch it like a hawk so that the cheese melts, but doesn't burn. I think mine took about 5 minutes. (It was all freshly made, so it didn't need to heat through.)
    Serve with some steamed broccoli, other veggies, a salad, or just on its own for some lovely, end-of-winter happiness! My boy loved it (he licked his plate, and went back for seconds, and licked the serving spoon with gusto!) And if I can do that whole thing while talking on the phone for an hour, you can do it too!

    Enjoy, my lovelies!

    Bookmark and Share

    Friday, August 27, 2010

    Potato, Leek and Blue Cheese Soup

    Hi ladies!

    After the veggie heaven on Sunday, I still wasn't satisfied, and while paging through the latest Fresh Living magazine, I saw a recipe for potato, leek and blue cheese soup, which looked divine! And it was easy (they recommended buying the potato and leek soup mix - and who am I to complain about not having to chop and wash leeks?)
    But you know me by now, right? Can I stick to a simple recipe? No! So I jazzed it up (only slightly) with some extra cheese (you knew that, right?) and some bacon. Now, in my humble opinion, you can add bacon to virtually anything and it makes it better, right? So this was, obviously, better. Salty, crispy little bits of bacon buried in the rich melty cheese goodness of this soup, heaven!

    And without further ado, I bring you the incredible, rich, cheesy delight that is this soup!

    Potato, Leek and Blue Cheese Soup

    Ingredients:
    1 packet potato and leek soup mix
    1 triangle (100g) blue cheese
    750 ml veggie stock
    250 ml milk
    1 tbsp blue cheese cream cheese (Simonsberg make it, and it's divine)
    4-8 rashers streaky bacon
    1 tsp garlic
    Salt and pepper to season

    Method:
    1. Heat a heavy bottomed soup pot on the stove, and fry the bacon until some of the fat melts. There's no need to go mad with the bacon now, we're going to crisp it up in the oven later, this is just to get some of the porky goodness into the soup.
    2. Remove the bacon, and set aside.
    3. Put the garlic in the hot fat, and fry for a few seconds.
    4. Add the potato and leek soup mix in, and stir in the hot fat for a bit. If it gets a bit dry, just add a little olive oil, and continue to stir for a couple of minutes.
    5. Add the hot veggie stock and the milk, and simmer, stirring occasionally, for about 30-40 minutes, or until the potato is cooked through.
    6. Blend to your preferred consistency (I like mine quite smooth), and return to the heat.
    7. Chop the blue cheese wedge up, and add it to the soup, stirring to melt it into the soup.
    8. Taste and season with salt and pepper.
    9. Serve hot and melty, with a tsp of blue cheese cream cheese and a sprinkle of fresh parsley.
    Enjoy!

    Bookmark and Share

    Tuesday, August 24, 2010

    Roasted Chicken and Veggies


    Hi lovelies!

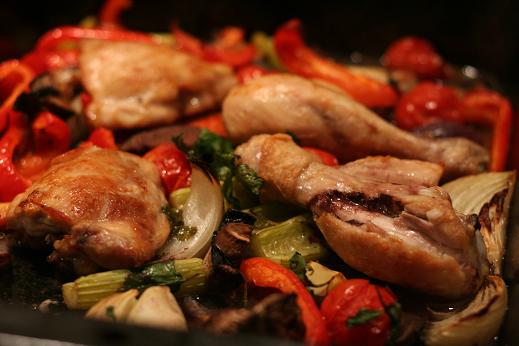
    I'm back in action, and have been missing cooking so much, I leaped at it as soon as I got home, with a veggie packed roast on Sunday for lunch. After consuming my body weight in pizza, pasta and bread while we were away, I was craving veggies like nobody's business! So on Sunday, we had the hubby's (!) cousin over for lunch, and I had yet to shower. So I tossed some veggies, herbs and chicken pieces in the oven, and an hour later, voila! We had a delicious lunch! YAY!

    {Image source}

    Don't you just love non-involvement meals? I love that about oven-cooked meals, there's no stirring, adding, fiddling and fussing. Just put it all in, and wait (go have a shower, as I did!), and when you return, you have a lovely meal just waiting to be served - what bliss!

    This may seem to be a very simple meal, and a recipe isn't really necessary, however, I know I've had trouble roasting things before (too much oil, too little heat, etc.), and I decided to share this for the uninitiated. This isn't foodie delight, but it is an enormously satisfying meal, without the guilt of a big, rich meaty meal. Unless you serve sticky toffee pudding after... which I may or may not have done...

    Roasted Chicken and Veggies

    Ingredients:
    1 pack chicken thighs & drummers (or whatever pieces you like)
    1 pack roasting veggies or some peeled and roughly chopped butternut, bell peppers, red onion, baby marrows, baby carrots, broccoli, etc. (forgive me, it was just a day after we got home, and chop, chop, chop sounded like hell)
    1 tsp Kara's Greek Herbs
    1 tsp dried parsley
    Splash of white wine (I had some slightly sweet wine in the fridge - Delheim Spatzendreck)
    Splash of white balsamic with thyme
    Sprinkle of olive oil
    Salt and pepper to taste.

    Method:
    1. Preheat the oven to 200C.
    2. Heat a heavy bottomed pan on the stove, with just a small spray of oil. Place chicken pieces in in batches, skin side down, to brown, turning to brown both sides. Don't turn the chicken too often, what you want is that browned taste and to seal the chicken. Remove to plate, and repeat until all chicken is browned on all sides.
    3. Spray an oven dish with oil (Spray & Cook is what I use), and put the veggies in. Sprinkle the herbs over the veggies, and splash some of the wine and balsamic in. You don't need a lot, just a bit to help the food not to dry out.
    4. Sprinkle some olive oil over the veggies, and toss it all about to coat everything in all the delicious herbs and liquids.
    5. Place the browned chicken pieces in among the veggies, with the skin side up.
    6. Pop into the oven, and take out to stir the veggies every 20 minutes or so. At the first stir, turn the chicken pieces over and cook that way for a while, and 20 minutes before the end, turn them back over.
    7. Remove from the oven when you pierce the fattest part of the chicken pieces (so for me, it was the thighs), and the juice runs clear. The veggies should be lovely and roasted by this stage anyway.
    Serve with rice, mashed or roasted potatoes, or baby potatoes in garlic and butter, as I did. This flavourful veggie-fest will warm your heart, and give you lots of your necessary 5-a-day!

    Enjoy!

    PS. I never bought that camera I promised I would, and our point n shoot is full of holiday snaps. Soon, my lovelies, soon! In the interim, other peoples photos will need to do - much lovelier than that I can come up with!

    Bookmark and Share

    Friday, August 13, 2010

    Guest Post: Nina Timm with Slap Degie

    As I have mentioned, while I'm away on holiday, some of my lovely blog and twitter friends have offered to guest post for me! Blown away by this amazing offer, I've given them pretty much free reign to write what they like, and just LOOK at what they've come up with!

    Here's Nina from My Easy Cooking with something amazing, just for you. Take it away!


    Last year some time, I posted this recipe on Food24 and got such a huge response from it that I have chosen this as my guest post recipe here on polkadotcupcake cooks.

    Yesterday, when I did a cooking demo for a group of ladies, I chose this easy batter recipe to show just how versatile it is. We have teased my mom so many times over the years about this, but when she serves this "slap degie" on stewed fruit served with game, or uses it to make a hearty beef stew (that’s even more delicious!), we are all quiet and all you hear around the table are sighs of satisfaction and bliss. This "slap degie” (runny batter) changes the ordinary to the sublime and supper into a plate of comfort food.
    I implore you to try this, once you've made it, try to add herbs or spices or even cheeses to it. Let me know what you think!!

    Slap Degie (runny dough)

    Ingredients:
    250 ml self-raising flour 

    1 egg 
    half a cup milk 
    half a cup oil 
    salt

    Method:

    1. Break the egg in a cup and fill to halfway with milk and then to the top with oil.
    2. Pour into a mixing bowl.
    3. Add the flour and salt and mix. If the batter is too stiff, add a little more milk. That is it!
    Pour it over meat, stewed fruit, chicken, whatever you like. Just bear in mind, your meat or fruit has to be cooked already, this is just a topping and bakes in about 25-30 minutes. Placing onion rings onto the batter just before baking it makes the circles on top of my pie.

    These are just some of the comments I received in response to this recipe

    KEN DIE DEGIE... OUMA HET DIT ALTYD OOR DIE WILDSPASTEI GEGOOI...

    TE LEKKER...
    EN KWEPER JELLIE...
    Brilliant recipe Nina, I've got a similar one from my Granny too. Works for just about anything and everything
    This looks so delicious Nina! I've also read about the slap degie in my "Kook en geniet" but I've never tried it and it is so easy!
    Thinking about it... I suppose one could even use polenta instead of flour in this, eh? Would be lovely on top of a chili con carne type of stew!
    (Erm... would using polenta change the amounts or the cooking time, do you think, chef?)-- and one would then probably have to add maybe half a teaspoon of baking powder or so, hey?
    Thanks so much for sharing this!! What a brilliant way to use up leftovers - just make a "stew" and cover with this topping! I will probably even try this tonight!!
    ag dis n vrek lekker resepie! ek maak dit vir skaapskenkel pastei! pragtige fotos!
    Yummy!!!Now I am soooo hungry!!

    Note: Images are all Nina's own.
    Related Posts Plugin for WordPress, Blogger...